Here’s how I manage my Receipts and Documents.
Time to shed a tear 😢 because my long-time Mac application companion Mariner Paperless (and formerly ReceiptWallet) are no more. This year (2023) it looks like Mariner software has gone belly. Their Web site has been down for several months. And there have been no meaningful updates to the Paperless software in several years. Even the original creator of ReceiptWallet has moved on. I’m sad to see it go, but the future is here and change I must, so here we go. Let’s talk!
First, I’ll explain my organizational system. Then I’ll dive into technical bits to explain how to extract receipts and documents from Mariner Paperless and organize them in the new organization system. Finally, I’ll share my iOS Shortcuts that I use to scan documents such as receipts on the spot and have them processed with OCR so that the contents of the files are searchable in Finder.
Let’s go!
Receipt & Document Organization System
My requirements are very simple when it comes to receipts and other documents. I need to know the date, and the merchant/vendor/title of the document. That’s all. And these days with OCR software, this setup works even better for me than Paperless and Receipt Wallet did. Best of all, this goes back to simple files & folders organization in macOS which is much more resilient to change in the future. Back to the basics I go.
The Library 🗄️
I have several folders that represent Libraries. A library contains things like Receipts and documents. Here are my Libraries, and I do make use of emojis so these stand out in Finder:
- 🗄️ Documents Library — personal Documents that are not Financials–think letters, health documents, postcards, and so forth
- Finances / 🗄️ Financials Library — I have a top-level folder for Finances for things like Quicken data files, business records and so forth. Inside Finances I have my Financials Library which contains all documents that are finance related. Think receipts and legal paperwork and bank statements.
And then I have separate libraries for each of my businesses and so forth. But really, the Documents and Financials Libraries are the two that I use the most and nearly every day.
Folder Hierarchy
I want all my files in one folder and sorted by date. Unfortunately, Apple’s software like Finder, iCloud Drive do not perform well with hundreds and thousands of files in one directory. I have more than 7,000 receipts and documents! I had to workaround these issues so that all my iDevices work with acceptable performance.
I use a concept of Work in Progress vs. Archive. There is information that’s relatively recent and timely. These timely files I am more likely to be looking for and that’s my current active work in progress files. Then there’s the archive. The archive contains things that I need to keep, but probably am not going to be searching, except on rare occasions. Here’s a screenshot of how my Financial Library appears in Finder.
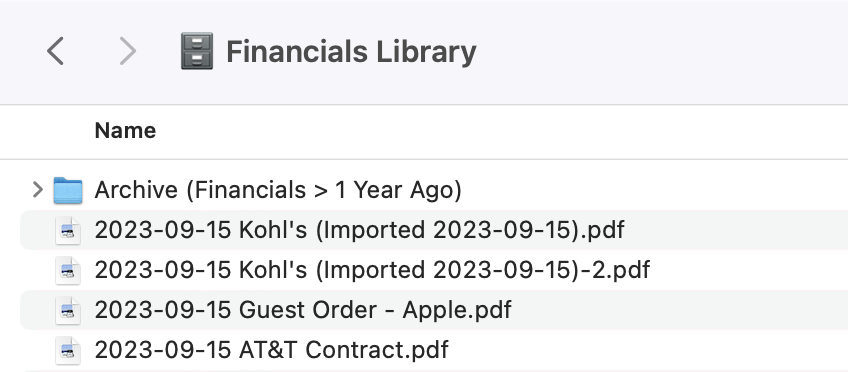
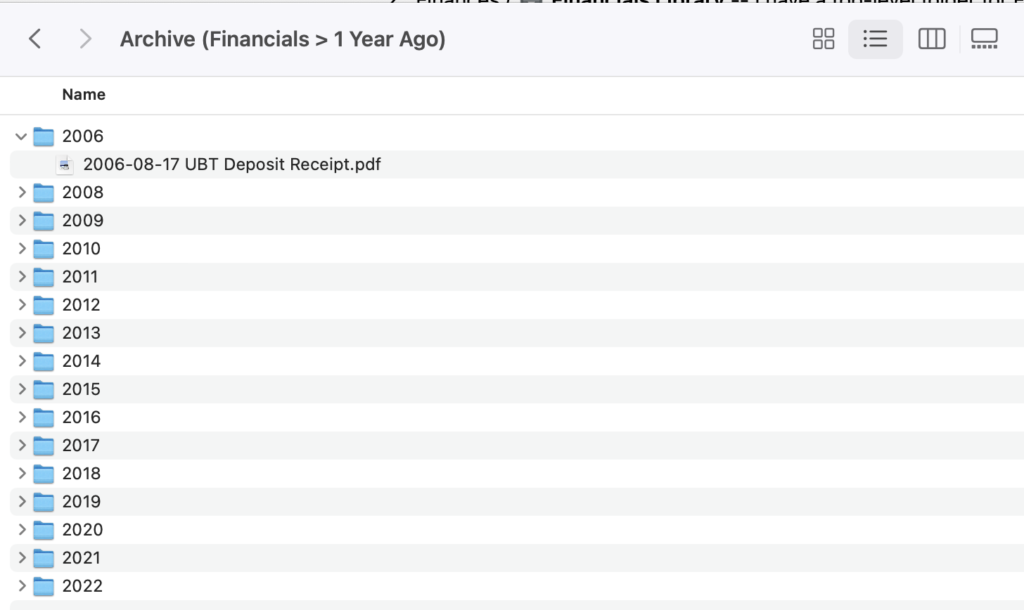
And then inside the Archive folder I have folders for each year and within each yearly folder I have my files for that year. I don’t break the hierarchy further into months and days to keep the system as simple and low maintenance as I can. I want document capture and organization to be a “thing” that just happens with as little thoughts as I can get by with. I want it to be as low friction as I can make it. Here’s what my Archive folder looks like.
Naming Convention
Keep the naming convention simple! I use YYYY-MM-DD Merchant/Title and leave it at that. See the example in screenshot above 2023-09-15 AT&T Contract. It’s as simple as that. Done and dusted! Most other metadata does not matter at the end of the day.
I use Quicken for the financial analysis and if I’m looking for a supporting document, receipt, or statement I already know the date of the document that I’m looking for and the Merchant or Title. When Finder is sorted by Name in this format, it’s very fast and easy to look up the document I’m looking for. And in the worst case, then I can search using Spotlight to find what I’m looking for with the OCR text.
Scanning New Documents
I have made my intake process as simple and low friction as possible, and it’s straightforward. First, I scan the document as soon as I receive it, set the date, set the title. Done. I built an Apple Shortcut to automate document intake, and I share that below. Okay, there is one more step and that’s to add the OCR, and I have a Shortcut workflow for that too.
Shortcuts Workflow to Save Receipt
I created a Shortcuts workflow to automate receipt capture. I used to save paper and scan it all every week, but now instead I just take a photo and the file is uploaded to iCloud immediately. Bam, boom, done! My shortcut handles multi-page documents as well and is very simple and intuitive to use.
↘️ Download Shortcuts workflow to save a receipt ↙️
Shortcuts Workflow to Run OCR
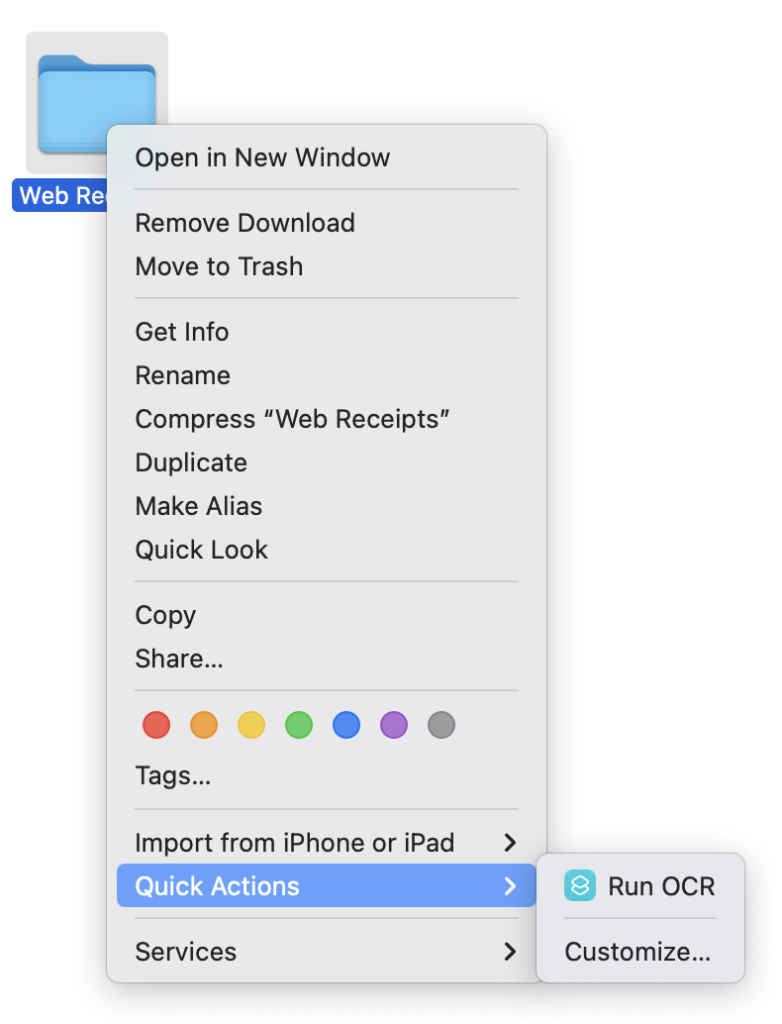
Another handy shortcut that I created is a command to run OCR on files in my Web Receipts folder. This way the text from the PDF and images are searchable in Finder. There is Setup work to do behind the scenes to make this work that I talk about next, but the result is a simple right-click context item to run OCR like this:
↘️Shortcuts Workflow to Run OCR ↙️
Setup OCRmyPDF for the OCR Shortcut
This shortcut runs a shell command behind the scenes and relies on two bits of software that you need to install for this to work: 1) ocrmypdf, and 2) parallel. Both are easily installable through Homebrew with this command in Terminal:
brew install ocrmypdf parallelExtract Receipts & Documents from Mariner Paperless
With the new setup all taken care of, let’s look at how to extract receipts and documents from Mariner Paperless (formerly ReceiptWallet) and then move on with our lives.
Step 1: Save Individual Files
- Open Paperless goto Settings and check the box to “write metadata to PDFs”
- Close settings and goto the Library in List view to see all your documents
- Select all documents with cmd+A
- Goto File -> Export to Individual Files and pick a temporary file location.
After Paperless has exported all your documents we can clean up the file naming convention for our new standard and run OCR next. Let’s move to renaming the files in bulk.
Step 2: Rename Files into the Naming convention
Below is a simple shell script that you can run that will rename the files that Paperless exported into the desired YYYY-MM-DD format. You can copy/paste this code into a file named something like runme.sh and then execute from terminal in the folder containing your files to rename.
#!/bin/bash

for file in *; do
    # Check if the file name contains a date in various date formats
    if [[ "$file" =~ ([0-9]{1,2}-[0-9]{1,2}-[0-9]{2}) ]]; then
        # Extract the date part from the file name
        date_part="${BASH_REMATCH[1]}"

        # Convert the date to the desired format (YYYY-MM-DD)
        new_date=$(date -j -f "%m-%d-%y" "$date_part" "+%Y-%m-%d" 2>/dev/null)
        if [ -z "$new_date" ]; then
            new_date=$(date -j -f "%m-%d-%y" "0$date_part" "+%Y-%m-%d" 2>/dev/null)
        fi

        if [ -n "$new_date" ]; then
            # Rename the file with the new date format
            new_name="${new_date} ${file//$date_part/}"  # Replace the date part
            new_name=$(echo "$new_name" | sed 's/ - //g')  # Remove trailing " - "
            echo "Renaming '$file' to '$new_name'"
            mv "$file" "$new_name"
        fi
    fi
done
Step 3: Run OCR
Install the ocrmypdf and parallel utilities noted above. You can run the OCR script through the Shortcuts workflow, or directly in terminal with the following command:
parallel --tag -j 8 ocrmypdf --redo-ocr '{}' '{}' ::: *.pdfStep 4: Move files into a Library
After you have processed all your files int a sensible naming format and have run OCR on them to make them searchable in Finder, it’s time to move the files from your temporary holding location into your Documents Library.
The End 🙌
That’s it! It’s sad to see the little piece of great software called ReceiptWallet die such an uncelebrated death. I was a user of ReceiptWallet user from the earliest days of my transition to Mac. I feel that the App Store ecosystem has been slowly destroying what made the Mac great in the first place with sense of hobby combined with relentless care in crafting the apps because the creators of the apps used those apps themselves. It’s sad to see all new software now being made standard across all Operating systems through the abomination that is Electron and kin.
Leave a Reply